Pasta with Alfredo Sauce

photo 1

Pasta with Alfredo Sauce.  I think it is seriously one of life’s most delicious dishes.

I have a memory of eating an absolutely perfect dish of Fettuccini Alfredo at a very cute, very old authentic Italian restaurant in San Francisco many years ago.  I think it was one of the first weekend trips that Tony and I ever took together.  For the life of me, I can’t remember the name of the restaurant, but it was near Lombard Street.  It was a tiny little place…dark and candlelit inside, with wine racks built in to the walls.  I have a vague recollection of the menu being written entirely in Italian and the waiter translating every dish for us.  Could that be? At any rate, I’ve ordered Fettuccini Alfredo and made Alfredo sauce at home (with just about every kind of pasta) many, many times over the years and I’m always reminded of that lovely little Italian restaurant.

So I’ve convinced you how delicious it is, but did I mention easy too?  Really easy.  Three basic ingredients –  cream, butter and Parmesan cheese.  That’s about it.  Okay, some recipes call for a pinch of nutmeg, some add garlic, some a little lemon zest.  And its a great way to use leftovers – you can toss just about anything into the sauce – cooked chicken, shrimp, ham and all kinds of veggies – asparagus, peas, broccoli, artichoke hearts.  It’s so easy that I’m not sure why they ever even invented those frozen microwaveable versions or (even worse) the kind that comes in a box with a sauce you make from a packet…blech!

My most recent favorite Alfredo sauce recipe is from (you guessed it) the Smitten Kitchen Cookbook.  Just the other night I made it with penne and added some frozen grilled asparagus spears from Trader Joe’s.

Convinced?  I think you should try it.  Really.  You won’t ever use the frozen or boxed stuff again.

 Pasta with Alfredo Sauce

adapted slightly from the Smitten Kitchen Cookbook – makes 2-3 servings

INGREDIENTS

8 ounces your favorite pasta

1 cup heavy cream

4 ounces (half of a stick) unsalted butter

1 tablespoon fresh lemon zest

pinch of nutmeg

salt and freshly ground black pepper

1 cup finely grated Parmesan cheese

1 tablespoon chopped fresh flat-leaf parsley

Optional – 1 cup cooked chicken or shrimp or ham and/or fresh or frozen vegetables, chopped

DIRECTIONS

Bring a large pot of water to the boil.  Add the pasta, and cook according to package instructions. If using fresh vegetables, toss them in with the pasta for the last minute or two too cook.  If using frozen vegetables, they’ll only need 30 seconds or so.  Reserve about 1/2 cup pasta cooking water, and set aside.

Drain the pasta and vegetables (if using) together.

Dry out the pasta pot, and pour in the heavy cream.  Bring the cream to a simmer, and cook until slightly reduced, about 4 minutes, stirring frequently.  Add the butter, and stir until it has melted. Generously season the sauce with freshly ground black pepper; add a pinch of salt, the lemon zest and nutmeg.  Add 3/4 cup of the Parmesan and stir until you have a smooth sauce.  Toss in the drained pasta and vegetables.  If using cooked chicken or ham or whatever, toss that in.  Cook the pasta in sauce for about 2 minutes, until the sauce has slightly thickened.

At this point, SK says to add the reserved pasta water by the spoonful if needed to loosen the sauce…I’ve never actually done this.

Divide the pasta among bowls.  Garnish with remaining Parmesan and chopped parsley.


Gingerbread Spice Dutch Baby

IMG_5129

Easy. Delicious. And, really, how cool looking is it – all puffy in that cast iron skillet?

I had never even heard of a “Dutch Baby” until I bought my copy of the Smitten Kitchen cookbook last fall.  But when I saw her gorgeous photo and read the description and ingredients for Gingerbread Spice Dutch Baby, I knew I had to try it.  Kind of sounded like a cross between a popover, and the Swedish pancakes my mom used to make when we were kids, but with gingerbread spices thrown in.  My kind of breakfast!

So one chilly Sunday morning I made one.  So easy.  I mean, really, SO easy (like, seriously, you mix the ingredients in a blender and then bake it for 15 minutes in the oven). And delicious.  It’s amazingly light and hearty at the same time.  And it makes your kitchen smell really good.  A perfect weekend morning breakfast treat…I’ve made them dozens of times since.

Gingerbread Spice Dutch Baby

INGREDIENTS

2 large eggs

1 tablespoon packed brown sugar

1 teaspoon light molasses

1/3 cup all-purpose flour

1/4 teaspoon ground cinnamon

1/8 teaspoon ground ginger

1/8 teaspoon ground cloves

1/8 teaspoon ground nutmeg

1/8 teaspoon kosher salt

1/3 cup whole milk

2 tablespoons unsalted butter

Powdered sugar, for dusting

Pure maple syrup, for drizzling

DIRECTIONS

Preheat the oven to 400°F. Place the eggs in a blender and blend for 1 to 2 minutes, until smooth and pale in color. Add the brown sugar, molasses, flour, cinnamon, ginger, cloves, nutmeg, salt, and milk and blend until smooth.

Melt the butter in a 9-inch ovenproof skillet over high heat, swirling it up the sides to evenly coat the pan. Pour the batter into the skillet and immediately transfer to the oven. Bake for 15 to 20 minutes, until the pancake is puffed up.

Remove from the oven, dust with powdered sugar, and drizzle with maple syrup. Serve immediately.

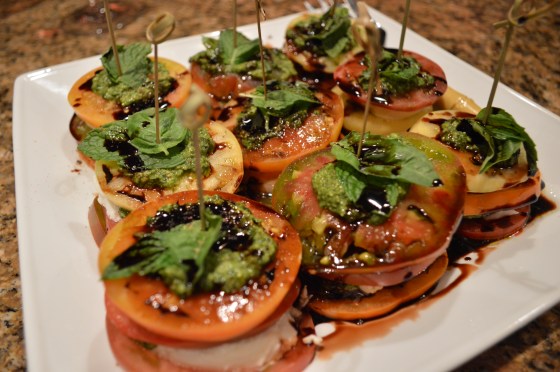
Caprese Salad with Heirloom Tomatoes, Fresh Mozzarella, Basil-Mint Pesto & Balsamic Reduction

photo (5)

About a month or so ago, Tony and I went to an Adventures by the Book event.  Adventures by the Book is a really cool concept – the owner, Susan McBeth, says she “offers worldwide opportunities for readers to connect with authors on an intimate basis through unique, interesting and adventurous travels and events.” I’ve been to several of them and they are always so fun and it’s such a clever idea.  I’ve been to a Ladies Literary Tea at the Westgate Hotel where I heard author Luisa Weiss talk about her memoir/cookbook/food blog.  I’ve been to the San Diego Air & Space Museum where we joined author Jennifer Niven (Velva Jean Learns to Fly) for a behind-the-scenes docent tour of the museum (very cool!) and have made pie with Beth Howard, author of Making Piece and blog The World Needs More Pie.

This particular “Adventure” was held at the iconic Croce’s Restaurant in downtown San Diego.  Ingrid Croce entertained and endeared us with stories from I Got a Name: the Jim Croce Story, about her life with her late-husband, renowned musician Jim Croce and how the dream of Croce’s came to be after Jim was tragically killed in a plane crash.  Ingrid signed copies of I Got a Name for all of us and also gave us copies of her cookbook Photographs and Memories: Recipes from Croce’s Restaurant & Jazz Bar.

Jimmy Rock (Ingrid's husband), Ingrid Croce, me, Tony

Jimmy Rock (Ingrid’s husband), Ingrid, me, Tony

Of course, I thumbed through the cookbook on the way home and I came across the Caprese Salad with Heirloom Tomatoes, Buffalo Mozzarella, Basil-Mint Pesto & Balsamic Reduction, which I immediately decided I’d make for a dinner party we were having the following weekend.

Well, the caprese was a hit.  It’s gorgeous and it’s delicious. Everyone loved it. I bought beautiful heirloom tomatoes at our local farmer’s market.  I made both the pesto and the balsamic reduction the day before.  I really like the addition of the mint in the pesto.  This is a keeper.  Thanks Ingrid.

Oh, and if you haven’t heard, Croce’s is closing their current location in the Gaslamp Quarter, with plans to open Croce’s Park West in the Banker’s Hill area of San Diego in mid-January 2014.  Sad to see them leave that space (they’ve been there nearly 30 years and were one of the very first restaurants in the Gaslamp and led the way for the multitude of eateries there now), but excited to check out the new digs!

Caprese Salad with Heirloom Tomatoes, Fresh Mozzarella, Basil-Mint Pesto & Balsamic Reduction

(Serves 4 to 6 – I made 9 “towers” for 6 of us)

INGREDIENTS

Balsamic Reduction

1/2 cup balsamic vinegar

2 tablespoons granulated sugar

Basil-Mint Pesto (makes 1 cup)

1/2 pound fresh basil

2 tablespoons fresh mint

2 tablespoons garlic, minced

2 tablespoons pine nuts, toasted

3 tablespoons freshly grated parmesan cheese

juice of 1 lemon (2-3 tablespoons)

1/4 cup extra virgin olive oil

salt & pepper to tasted

Salad Components

3 large heirloom tomatoes (assorted colors), cut into 1/4-inch thick round slices

1 pound fresh mozzarella, sliced

4 to 6 rosemary sprigs, optional (I actually skipped this and just used little bamboo appetizer skewers)

1/4 cup extra virgin olive oil

4 to 6 fresh basil sprigs

4 to 6 fresh mint sprigs

DIRECTIONS

Balsamic Reduction

Combine the vinegar and sugar in a small saucepan and bring to a boil.  Reduce by one half, or until the liquid just starts to chicken.  Remove from heat and let cool.  Will keep refrigerated, up to one month.

Pesto

In a food processor, purée the basil, mint, garlic, pine nuts, cheese and lemon juice until the mixture has a paste-like consistency.  With the processor running, add the oil in a slow, steady stream to emulsify.  Season with salt and pepper.  Will keep refrigerated, up to one week, or frozen for up to three months.

Presentation

On each salad plate, build a tower of alternating tomato slices, mozzarella slices and pesto.  Repeat three times, topping with a slice of tomato.  (I actually made smaller “towers” and served them all on one big serving plate.) Clean the bottom portion of the rosemary sprigs (if using) so that you can skewer the tomato towers with the sprigs. Drizzle the balsamic reduction and olive oil over the towers and around the plate, and garnish with basil and mint sprigs.  Finish with sea salt and freshly ground pepper.

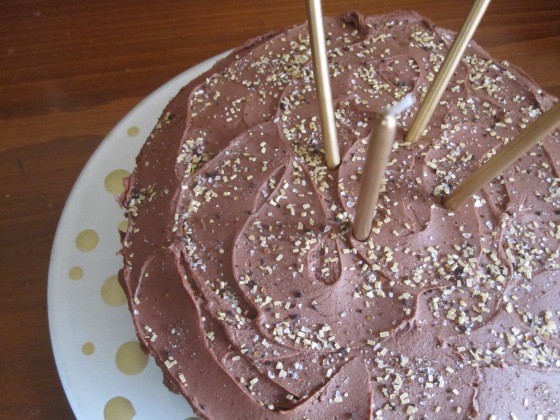
Old-fashioned Chocolate Cake (aka Tony’s Birthday Cake)

IMG_5529

Tony loves chocolate cake.  So when I first saw this recipe in Bon Appétit in September 1995, I knew that I’d make him one for his birthday that December.  And I did.  And he loved it.  And I’ve been making it for his birthday just about every year since.  It really is just a good “old-fashioned chocolate cake”.  It’s rich and moist and chocolatey and dense and pretty darn simple.  I love the addition of chocolate chips in the cake.  And the cocoa frosting is thick and fudgey…I could eat it off a spoon (and often do!)  And I love that it’s three layers!  It’s become a family favorite and a great birthday tradition.

IMG_5560

The Birthday Boy with his birthday cake

Silver Creek Pictures 076

For his 50th…made it into a quarter-sheet sized cake with a cute picture of little Tony

PS  The day after his birthday this year, our son Kyle’s friend Steven was over and was eyeballing the one leftover slice.  It was hard to give it up, but I did.  This was the text he sent later, “Dude.  Tell ur mom I wish it was my b-day so she could make me one of those chocolate cakes.  Good lord!  Best chocolate cake I’ve ever had.”  Steven’s birthday is May 31.

 OLD-FASHIONED CHOCOLATE CAKE WITH COCOA FROSTING

For cake
3 cups all purpose flour
2 cups sugar
1/2 cup unsweetened cocoa powder
2 teaspoons baking soda
1 teaspoon salt
2 cups cold water
1 cup corn oil
1 tablespoon vanilla extract
1 1/2 cups semisweet chocolate chips

For frosting
1/2 cup plus 2 tablespoons (1 1/4 sticks) unsalted butter, room temperature
5 cups powdered sugar
8 tablespoons (about) whole milk
1 1/4 teaspoons vanilla extract
3/4 cup plus 3 tablespoons unsweetened cocoa powder

Make cake:
Preheat oven to 350°F. Butter and flour three 9-inch-diameter cake pans with 1 1/2-inch-high sides. Sift first 5 ingredients into medium bowl. Mix water, oil and vanilla in large bowl. Whisk in dry ingredients. Divide batter among pans. Sprinkle 1/2 cup chocolate chips over batter in each pan.

Bake cakes until tester inserted into center comes out clean, about 25 minutes. Cool cakes in pans on racks 15 minutes. Cut around pan sides to loosen cakes. Turn cakes out; cool completely.

Make frosting:
Beat butter in large bowl until fluffy. Gradually beat in 3 cups sugar. Beat in 6 tablespoons milk and vanilla. Add cocoa and remaining 2 cups sugar; beat until blended, thinning with more milk if necessary.

Place 1 cake layer, chocolate-chips side up, on platter. Spread 2/3 cup frosting over. Top with second cake layer, chocolate-chips side up. Spread 2/3 cup frosting over. Top with remaining cake layer, chocolate-chips side down. Spread frosting over sides and top of cake.

(Can be made 1 day ahead. Cover with cake dome; let stand at room temperature.)

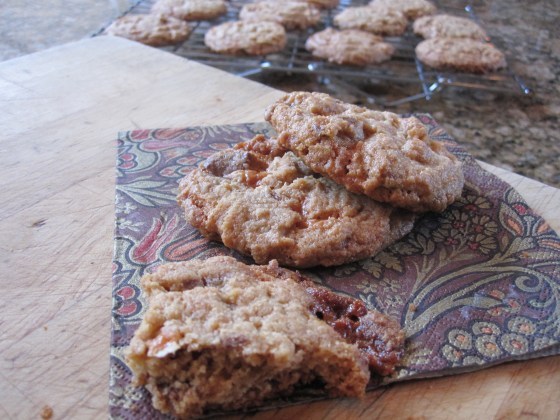
Peanut Butter Butterfinger Cookies

2013-11-17 004

A couple of months ago I went to this event at the San Diego Public Market called Cake Bake 2013.  It was a fundraiser to benefit No Kid Hungry.  There were booths featuring sweets for sampling from some of San Diego’s best bakers.  They had a Bake Sale and a Cake Walk (y’know, you’d think I would’ve learned…I never won a single thing in any cake walk at any of those Halloween carnivals when I was in elementary school and my luck didn’t change now.  Oh well, it was for a good cause). 

I discovered two really wonderful bakers that I hadn’t heard of.  Under the Crust…Hannah makes adorable and delicious “sweet & savory handcrafted mini pies” and sells them out of converted vintage pick up truck.  And The Cravory…really yummy cookies that you can actually have delivered to your home!  I, of course, left will a half dozen cookies…among them Lemon Bar, Ultimate Chocolate Chip, Rosemary Balsamic and a couple of their “Flavors of the Month”.  My very favorite was the PB Butterfinger…a peanut butter cookie with Butterfingers and Reese’s Peanut Butter Cups.  Holy Moly.

So, Halloween rolls around and I buy Reese’s, Snickers and Butterfingers (so what if I happen to buy my favorite candies??) to hand out to our trick-or-treaters. Well, the peanut butter cups were the first to go, but we did have a few leftover Snickers and Butterfingers, so I decided I’d use the Butterfingers to make my own Cravory-inspired cookies.  I spent a fair bit of time online trying to find a recipe for a peanut butter cookie with Butterfingers.  There were plenty of just regular chocolate chip variety recipes, but not many with peanut butter cookie dough (not sure why I didn’t just look in my favorite Dorie Greenspan Baking cookbook and use her peanut butter cookie recipe, but I didn’t think of it until the cookies were in the oven!  Sorry Dorie.)

1425761_606624326070801_1980419434_n

I found this one at My Baking Addiction (I loved the look of the blog…great photos and graphics).  I questioned the use of just egg whites, not whole eggs, but they turned out great.  Really great, in fact.  I really like that they are not too soft, not too hard, just right.  Might be my new favorite cookie (in fact, Tony said they are his new favorite!)

Would they have been better with Reese’s Peanut Butter Cups in them too?  Perhaps.  Next Halloween I’ll make sure to set aside some of those too. 

As Bart Simpson would say, “nobody better lay a finger on my (peanut butter) Butterfinger (cookie)!!”

Peanut Butter Butterfinger Cookies

(adapted from http://www.mybakingaddiction.com)

INGREDIENTS

1/2 cup unsalted butter, softened
3/4 cup white sugar
2/3 cup lightly packed light brown sugar
2 egg whites
1 1/4 cups crunchy peanut butter (I used smooth because that’s what I had in the pantry)
1 1/2 teaspoons pure vanilla extract
1 cup all-purpose flour
1/2 teaspoon baking soda
1/4 teaspoon salt
5 (2.1 ounce) Butterfinger candy bars, chopped (I used about 8 Halloween-sized bars; I think 5 regular-sized would be a lot)

 DIRECTIONS

Preheat oven to 350°. Line baking sheets with parchment paper.

In the bowl of a stand mixer fitted with the paddle attachment or in a large bowl with an electric mixer, cream the butter and sugars together until light and fluffy. Add the egg whites and beat well. Beat in the peanut butter and the vanilla, mixing until well combined.

In a small bowl, combine the flour, baking soda, and salt. Add the dry ingredients into the creamed mixture and mix until just combined. Stir in the chopped candy bars.

Using a medium cookie scoop (about 1 ½ tablespoons) shape dough into balls and place on the prepared baking sheets.

Bake in preheated oven for 10 to 12 minutes or until golden brown. Remove cookies from oven and allow them to cool for about 5 minutes on the cookie sheet before moving them to a cooling rack.

Caramelized Onion & Chanterelle Mushroom Tart

2013-11-13 003

Last month we were in Portland, OR, visiting our son Kyle and daughter-in-law (still just love saying that!) Calla.  It was blustery and rainy and very fall-like, which was a nice change for us, because when we left San Diego it was like 80 degrees.  Leaves were changing colors and we got to wear sweaters and boots and raincoats (and, believe me, for a San Diegan, this is exciting stuff!)

2013-11-07 08.35.37

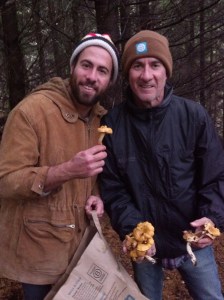
So what does one do in Portland when it’s grey and a little rainy?  Go foraging for chanterelle mushrooms! And now I have to preface this story by saying that every year, around this time, Kyle starts calling us just to brag about the tens of pounds of chanterelle mushrooms they’ve foraged.  I get a little envious. Some culinary experts call chanterelles the “king of mushrooms”.  According to thekitchn.com, “…they sprout from September to February, and grow wild in woodsy areas. They’re difficult to cultivate, but they sprout easily from forest floors….they have a firm flavor and texture and stand up to cooking and heavy sauces very well. The aroma of a chanterelle is sometimes described as being like a fresh apricot. A warning, though. Chanterelles are expensive!”  (Are they ever!  I bought them once.  At that high-end natural foods market.  $24.99 a pound!)

Okay, back to the foraging…Kyle and Calla and their roommate Jesse are quite the mushroomers. They have several “secret” spots around Portland.  Kyle took us to one of them.  We didn’t find a lot, but enough.  And it was really fun.

2013-11-07 12.33.05

Father-son foraging team!

That night, we made dinner at the kids’ place.  We decided that we would use the chanterelles that they already had in the fridge so that Tony and I could bring the ones we foraged back to San Diego with us.  Kyle pulled out his favorite recipe…pappardelle pasta with a chanterelle mushroom and lamb ragout and I made Kale and Brussels Sprouts Salad.  Yu-um!!  What a delicious dinner and a really fun evening that culminated with Kyle, Calla and Jesse’s band Gallop  practicing in the living room and Caramel Salted Dark Chocolate ice cream from nearby Ruby Jewel.  Doesn’t get much better than that!!

1393688_10202708541379667_1346551783_n

Gallop. Calla has a voice like an angel. Really.

When we got home with our little bounty of mushrooms, I was super excited to try a recipe I had clipped from Relish magazine a month or so prior…Caramelized Onion-Chanterelle Tart. Of course, when I first saw it, knowing that our little mushroomers had an abundance of them, I scanned it and sent it to Kyle, who made it the very same night and said it was delicious.  After our own foraging expedition, I could hardly wait to try it myself!

2013-11-13 001

Well, it was worth the wait.  Kyle was right, it was delicious. I mean, really delicious!  The combination of flavors is incredible…savory-sweet onions and earthy mushrooms, Dijon mustard and Gruyere cheese.

Of course, you can make this with any kind of mushroom. But how cool is it that we actually foraged the mushrooms we used???  Forest to table!!

Caramelized Onion & Chanterelle Mushroom Tart

INGREDIENTS

1 refrigerated pie crust
1 tablespoon Dijon country-style (course-grain) mustard
2 tablespoons butter, divided
2 medium onions, sliced lengthwise
Sprigs of fresh thyme
4 ounces chanterelle mushrooms (or your favorite mushroom) sliced lengthwise
2 large eggs
1 cup half-and-half
1 cup shredded Gruyere cheese
1/4 teaspoon sea salt
Freshly ground black pepper

DIRECTIONS
Preheat oven to 350°.

Roll out pie crust to fit in a 12-inch tart pan. Place in pan and press into the sides. Coat surface with mustard. Bake 10 minutes. Let cool.

To prepare filling, melt 1 tablespoon butter in a deep skillet over medium heat. Add onions and sauté 15 minutes. Add salt, pepper and thyme leaves. Scrape into a small bowl.
In the same skillet, melt remaining butter. Add mushrooms and cook 10 minutes. Remove from heat.

Combine eggs and half-and-half and beat until well blended.

Sprinkle about half the cheese on the bottom of tart shell. Spoon in onions. Pour in egg mixture. Place mushrooms all over the top, along with remaining cheese.

Bake 40 minutes, or until tart is golden brown and filling is set. Serve warm or at room temperature. Serves 12.

Butter-Roasted Tomato Sauce

2013-10-27 002

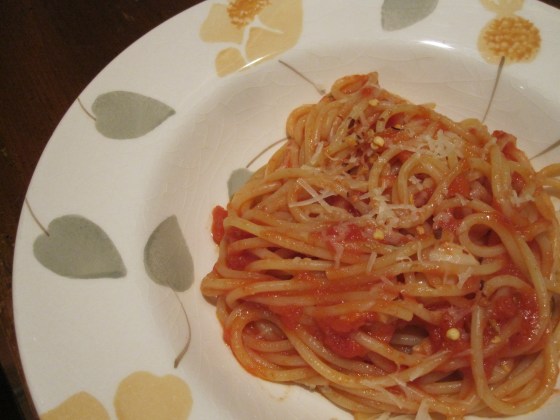
The November/Thanksgiving issue of Bon Appétit is my second favorite issue (first being July’s “Barbecue”).  But this November, it wasn’t a Thanksgiving recipe that caught my attention.  It was this tomato pasta sauce recipe.  The description read, “Roasting coaxes depth from canned tomatoes, instilling a long-cooked flavor. A generous amount of garlic and anchovies adds even more character.”  Hmmmm.  I was pretty skeptical when I read through the recipe…I thought it actually looked too easy (and didn’t have enough ingredients) for that to be true.  Plus, one of the few ingredients is anchovies (read on).  But I know that one of our favorite restaurants when we visit our son in Portland, Nostrana, makes a gnocchi with butter tomato sauce, so I decided to try it.

Just FYI, usually if a recipe calls for anchovies, I leave them out.  But I guess I’m getting a little braver in the trying-foods-you-always-thought-you-hated department in my old age so I decided to go for it.  And, I’ve reading a lot lately about anchovies adding “umami” (you know, “Umami /uːˈmɑːmi/, a savory taste, is one of the five basic tastes…together with sweet, sour, bitter and salty”).  And FYI again, did you know that Worcestershire sauce is made from anchovies?  And I happen to really like Worcestershire. Alright. I’ll add the anchovies.

But back to the tomato sauce.  Once again, BA did not disappoint.  This is so unbelievably easy and delicious.  It takes almost no time to make and you’d think it had been simmering in a pot all day. Honestly the best tomato sauce I’ve ever had.  I don’t believe I’ll ever simmer again!  And, yes, I’ll be adding the anchovies.

Butter-Roasted Tomato Sauce

Bon Appétit, November 2013

INGREDIENTS

1 28-ounce can whole peeled tomatoes

8 garlic cloves, peeled, crushed

2 anchovy fillets packed in oil

1/4 cup (1/2 stick) unsalted butter, cut into small pieces

1/4 teaspoon crushed red pepper flakes plus more for serving

Kosher salt, freshly ground pepper

12 ounces bucatini or spaghetti

Finely grated Parmesan (for serving)

DIRECTIONS

Preheat oven to 425°F. Combine tomatoes (crushing them with your hands), garlic, anchovies, butter, and 1/2 teaspoon red pepper flakes in a 13×9″ baking dish; season with salt and black pepper.

Roast, tossing halfway through, until garlic is very soft and mixture is very thick, 35–40 minutes. Using a potato masher or fork, mash to break up garlic and tomatoes. (I mixed it a little bit with my hand blender.)

Meanwhile, cook pasta in a large pot of boiling salted water, stirring occasionally, until al dente. Drain, reserving 1/2 cup pasta cooking liquid.

Return pasta to pot and add tomato sauce and pasta cooking liquid. Cook over medium-high heat, tossing until sauce coats pasta, about 3 minutes. Serve topped with Parmesan and more red pepper flakes.

DO AHEAD: Tomato sauce can be made 4 days ahead. Let cool; cover and chill. Reheat before mixing with pasta.

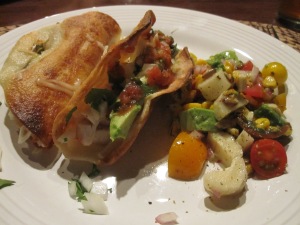
Crispy Fried (Leftover) Turkey Tacos

2013-11-26 003

One of the best things about hosting Thanksgiving at your own house is leftovers…leftover turkey especially. The last several years, Tony and I have gone to Sonoma to celebrate the holiday with our daughter-in-law’s family (see last year’s post here), which is so much fun and so much delicious food, but no leftovers!  This year, plans got all discombobulated and we are ending up staying in town with Tony’s family, which is great, but still no leftover turkey.

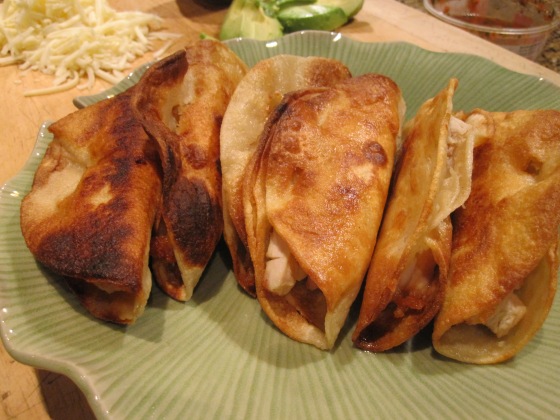
So last weekend we decided to roast a turkey breast, just for the two of us, so we could have leftovers.  Of course, we’ve done the mandatory BLAT sandwich, but still had more.  I recalled years ago going to Tony’s Jacal, a Mexican restaurant in Solana Beach that’s been around since 1946, where I had a turkey taco.  A deep-fried, crispy turkey taco.  It’s like their “signature” dish.  And it was one of the best things I’ve ever had.  (Which actually begs the question, “why haven’t I made them before now?”  Well, I guess because we usually only make a turkey for Thanksgiving, which, in and of itself, is dumb.  Every year, after T’giving, Tony says, “we should really make turkey more often.” And I agree.  And we never do.)

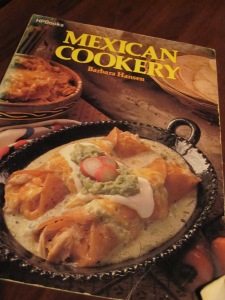
Okay, again I digress.  I had a general idea of how to do this (I mean, I can’t remember the last time I deep fried a taco…we’re all about soft tacos, right?) but decided I’d pull out the (very) old, tried-and-true HPBooks Mexican Cookery cookbook I’ve had for years and years and sure enough, instructions for “how to make & fill taco shells…you can fry tacos after they are filled.”  Bingo!

2013-11-26 006

HPBooks Mexican Cookery, circa 1980. And those chicken enchiladas verde on the cover are muy delicioso!

I couldn’t remember what toppings Tony’s Jacal served with their turkey tacos, but we decided on shredded jack cheese, avocado, white onion, cilantro and salsa.  They were muy bueno.  I mean, really really muy bueno.  Not sure what it is about the combination of turkey and deep frying the tortillas, but it is wonderful.  Really worth it.  No soft tortillas here!

I promise now I will be roasting a turkey more often, if only just to have leftovers for these tacos.  (I’m actually hoping I’ll be able to pilfer some of the leftovers from my in-laws on Thursday so I can make these again!!!)

And the tacos were delicious accompanied by one of our favorites, Pati’s Chop-Chop Salad.

2013-11-26 004

Crispy Fried (Leftover) Turkey Tacos

INGREDIENTS

Corn tortillas (you’ll probably want 2 or 3 per person)

Cooked turkey, shredded or cut into small pieces (you’ll need about 1/4 cup per taco)

Vegetable oil for frying

Your favorite accoutrements – we used shredded jack cheese, avocado, white onion, cilantro (I like to chop the white onion and finely chop the cilantro and mix them together in a small bowl for serving) and salsa.

DIRECTIONS

Heat each tortilla on a griddle until softened.  Place about 1/4 cup turkey on each warmed tortilla and fold in half.  Fasten securely with wooden picks.

Heat oil in a large skillet to 365° (don’t have a thermometer?  The easiest, and safest, method is to stick the end of a wooden spoon into the oil. If you see bubbles form around the wood and they start to float up, your oil is hot enough to cook with).

Fry a few tacos at a time in hot oil until they are crisp, turning as necessary.  Drain tacos on paper towels.  Before serving, remove the wooden picks and add your favorite accoutrements.

Homemade Salted Caramel Sauce

2013-11-16 012

Salted Caramel.  It’s everywhere, right?  I love it. There’s just something about that combination of sweet and salty.  My favorite dessert in the whole world is at Nostrana in Portland…Butterscotch Budino with Salted Caramel.  Oh. My. God.  I’ve made a few attempts at my own salted caramel sauce, but with not such great luck.

So, I was having a book club meeting at my house and was going to be perfectly satisfied with serving Brownie Sundaes (made from my “Only Brownie Recipe You’ll Ever Need” recipe) and drizzled with some store-bought chocolate fudge sauce and vanilla Haagen-Dazs ice cream, but the day before, a post on my Facebook feed from Bon Appétit pops up that says, “make homemade salted caramel sauce from scratch…to drizzle over anything and everything” and think it would be so good on the brownie sundaes!  Okay.  Fine.  I look at the recipe.  It looks pretty easy.  I’ll give it a whirl.

It was, in fact, VERY easy.  No candy thermometers involved.  I didn’t feel like I was waiting for ever and ever for the mixture to turn dark amber colored.  Honestly, the easiest and most delicious caramel sauce I’ve ever made (and I’ve experimented with a few!)  I could have eaten it by the spoonful, right out of the pot (okay, I’ll admit to using a spatula to scrape what was left in the pot to gobble up every drop!)

The sundaes were a hit ….you’re definitely going to want to make them. (And I highly recommend the book too…The Art of Hearing Heartbeats by Jan-Philipp Sendker.)

Now the question is what will I do with the sauce leftover in the fridge?  I’ve dipped green apples in it already.  It would be amazing drizzled over a slice of Pumpkin Roll or on top of a dollop of whipped cream on pecan pie or apple pie for Thanksgiving!  Stir a spoonful into your coffee or hot chocolate.  Even just lick it right off the spoon.

I might even be inspired now to try to find that Butterscotch Budino recipe and try it!

Homemade Salted Caramel Sauce

INGREDIENTS

3/4 cup granulated sugar

1 tablespoon light corn syrup

3/4 cup heavy cream

1 tablespoon unsalted butter

1/2 tablespoon flaky sea salt (such as Maldon)

For Brownie Sundaes you’ll need to bake a batch of double chocolate brownies (aka “The Only Brownie Recipe You’ll Ever Need“) and buy some Haagen Dazs vanilla ice cream 

DIRECTIONS

Bring granulated sugar, corn syrup, and 2 tablespoons water to a boil in a medium saucepan over medium-high heat, stirring to dissolve sugar. Boil, swirling pan occasionally, until mixture turns a deep amber color, 8–10 minutes.

Remove from heat and gradually add cream (mixture will bubble vigorously). Cook over medium heat, stirring occasionally, until smooth, about 2 minutes. Remove from heat and mix in butter and salt.  Let cool slightly before serving.

DO AHEAD: Caramel sauce can be made 5 days ahead. Cover and chill. Bring to room temperature before serving.