Tally Me Banana Bread

2013-03-06 005

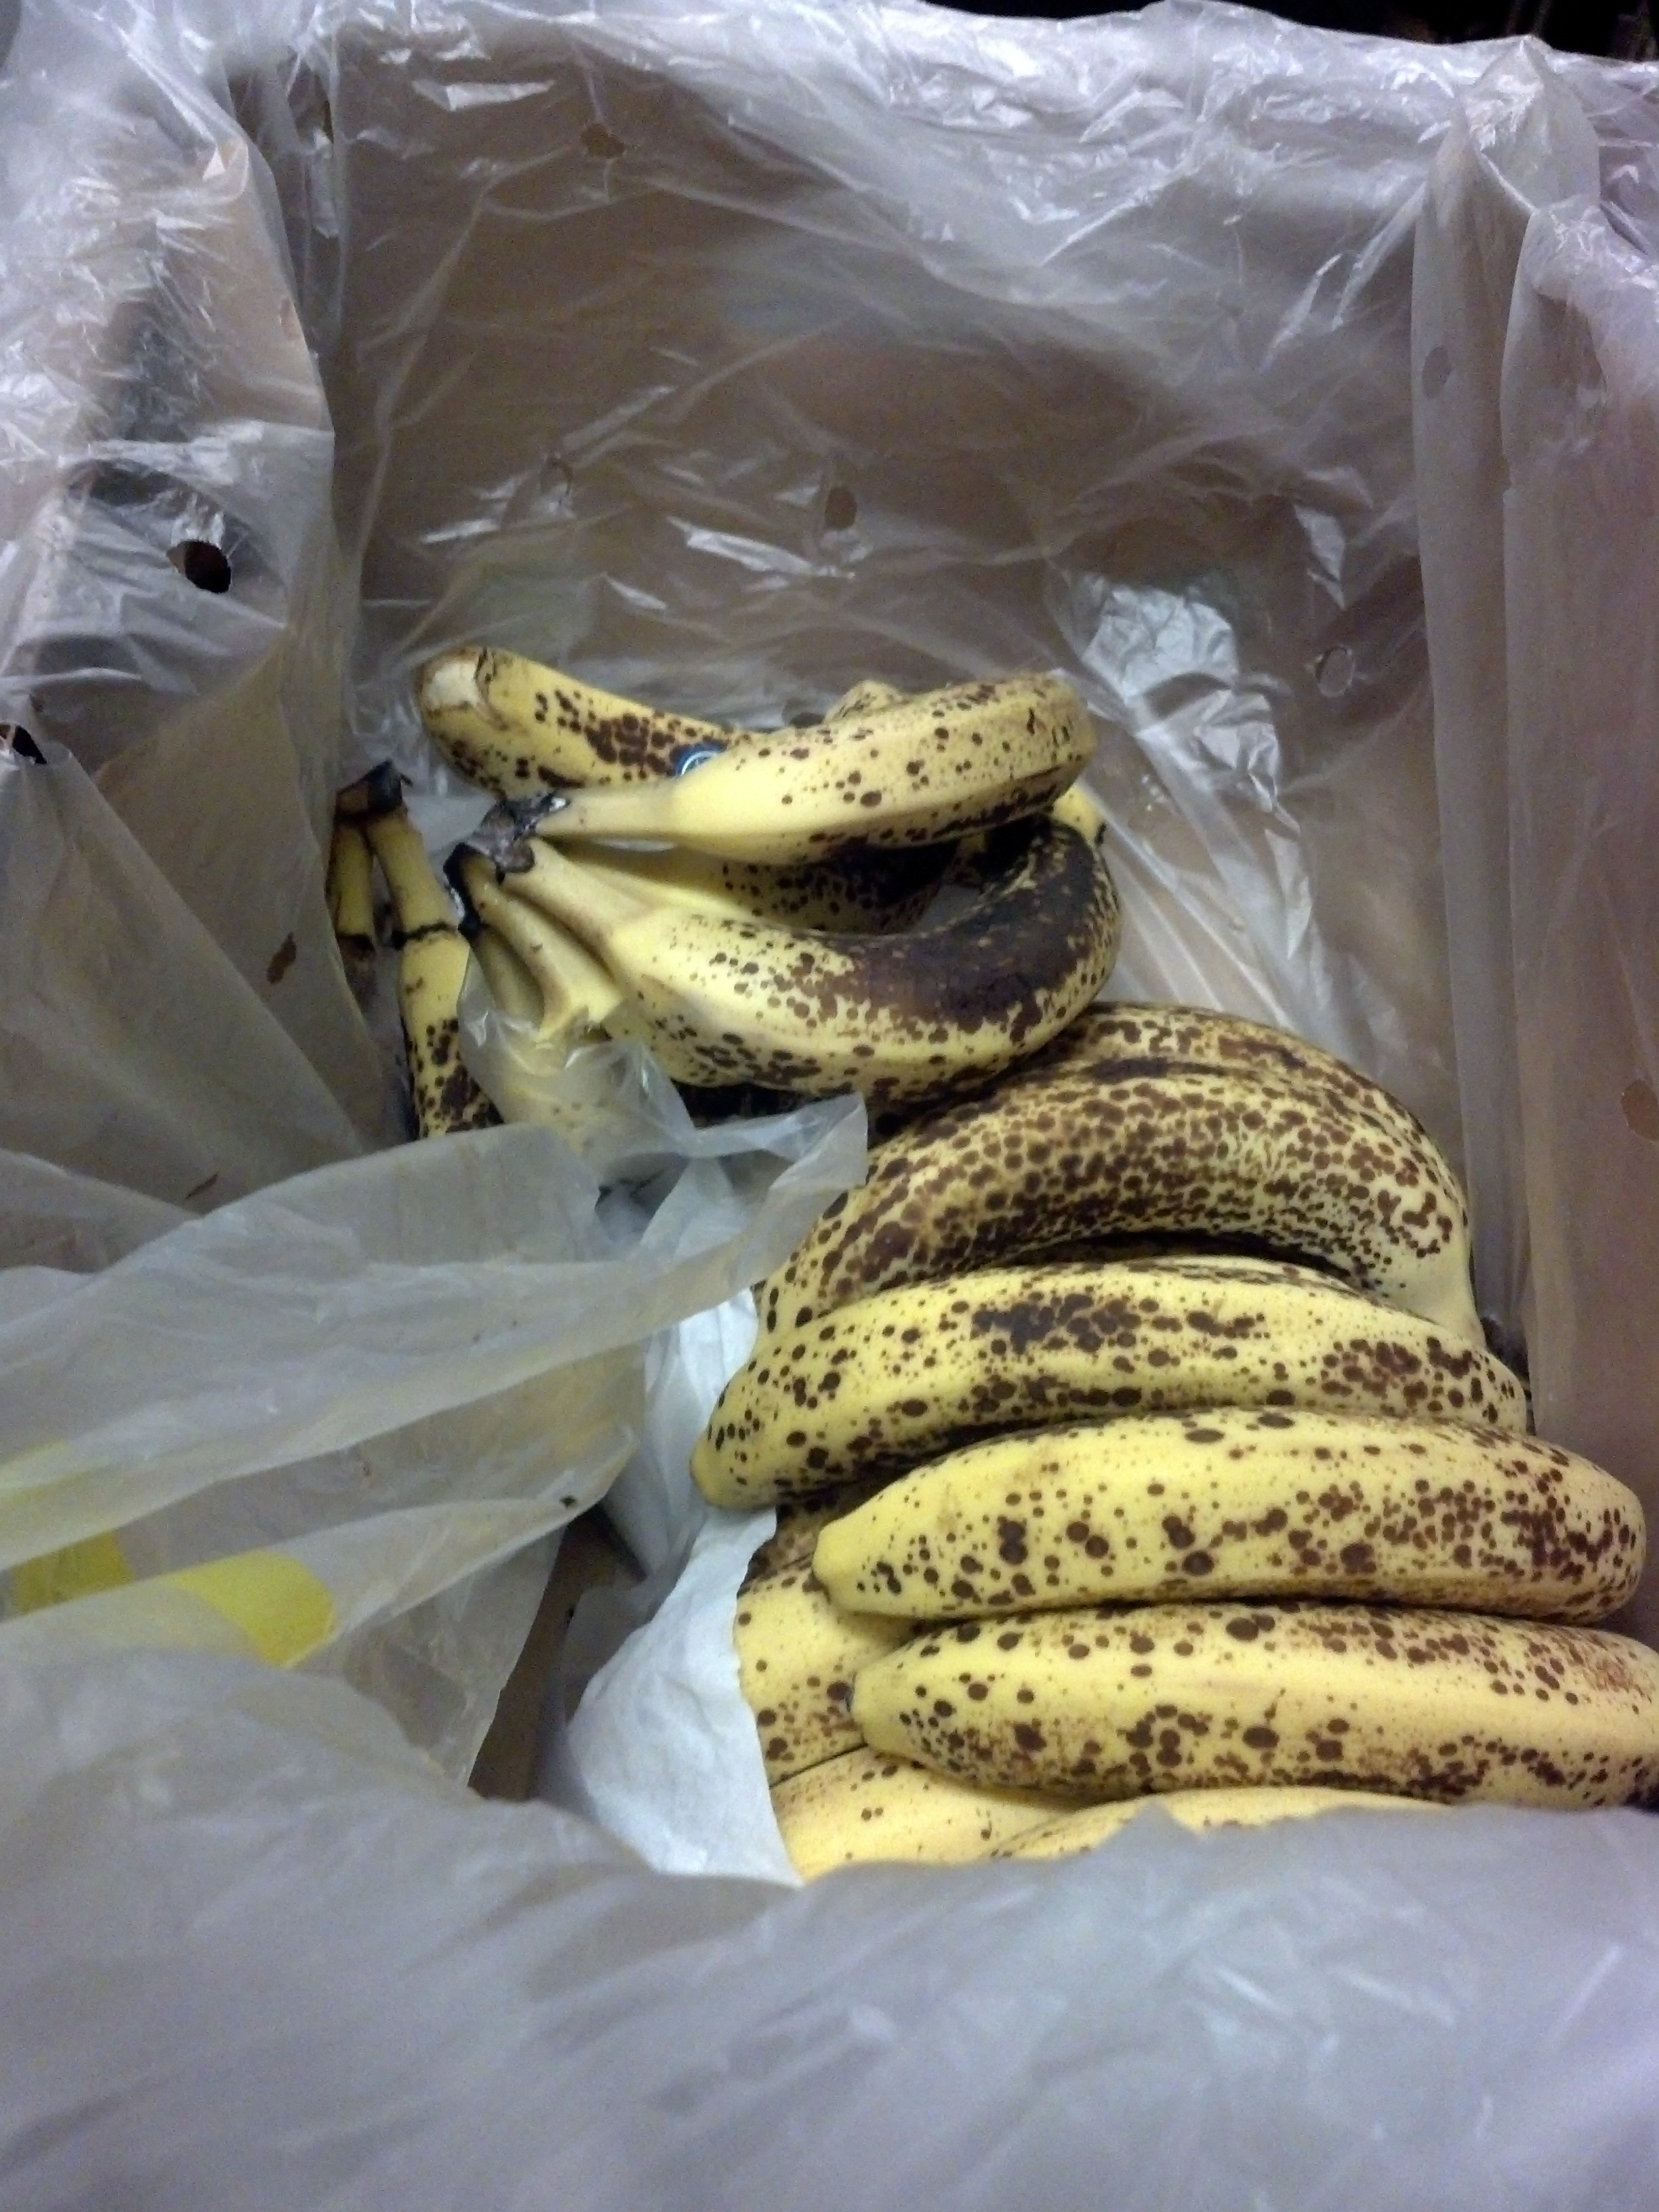
The other day, at the end of the work day,  I was sitting in my cubicle and heard people laughing and talking about banana bread.  So of course, I assumed there was some banana bread to be had and made a B-line for the office where the laughing and talking was coming from.  I was a little disappointed to see only a big box of past-their-prime bananas that were definitely ready to be made into banana bread.  I actually had been thinking about Smitten Kitchen’s “jacked up banana bread” and the following day we were having one of our monthly potlucks, so I grabbed a couple of bunches.   I didn’t catch the story of why or where the bananas came from, but when someone else asked the banana bearing coworker why she had so many bananas, naturally, I broke into my best Harry Belafonte “come Mr. Tally Man…tally me banana!”  Lol.  Hey.  It was the end of the day.

2013-03-06_11-59-04_768

So I get home with all of these bananas and Tony asks what I’m planning on doing with them.  I told him I’m going to make banana bread for the potluck.  He says, “you know how much I love banana bread, why don’t you ever make it for me?  You always bake the good stuff for work.”  (Right.  Same man who rolls his eyes and says things like, “what are we supposed to do with so many cookies/brownies/a whole cake?”)  Well…lucky for Tony I just happened to have a package of little aluminum foil mini-loaf pans.  I made three mini loaves, took two to work and left one just for him.  He was a happy camper.  (And, I still have a bunch of bananas in the freezer…Acai bowl????)

SK’s recipe is just about the best banana bread I’ve ever had.  And its really easy.  One bowl and a wooden spoon.  The only thing I change is that I add walnuts.  And name given this recipe by Deb of SK is “Elise’s Friend Heidi’s Friend Mrs. Hockmeyer’s Banana Bread, As Jacked Up by Deb (adapted from Simply Recipes)”.  That’s a little long.  Let’s just call it Tally Me Banana Bread.

Tally Me Banana Bread

INGREDIENTS

3 to 4 ripe bananas, smashed

1/3 cup salted butter, melted

3/4 to 1 cup light brown sugar (depending on the level of sweetness you prefer)

1 egg, beaten

1 teaspoon vanilla

1 tablespoon bourbon (optional)

1 teaspoon baking soda

pinch of salt

1 teaspoon cinnamon

1/2 teaspoon nutmeg

pinch of ground cloves

1-1/2 cups flour

3/4 cup chopped walnuts (divided use)

DIRECTIONS

Preheat the oven to 350°F. With a wooden spoon, mix butter into the mashed bananas in a large mixing bowl. Mix in the sugar, egg, vanilla and bourbon, then the spices. Sprinkle the baking soda and salt over the mixture and mix in. Add the flour last, mix. If using walnuts, stir in 1/2 cup now.  Pour mixture into a buttered 4×8 inch loaf pan. Sprinkle remaining 1/4 cup walnuts on top. Bake for 50 minutes to one hour, or until a tester comes out clean. Cool on a rack. Remove from pan and slice to serve.

The Best Freakin’ Carrot Cake

the best freakin carrot cake ever

I cut this recipe out of some magazine many, many years ago.  I cannot, for the life of me, remember what magazine it was, but I think it was Bette Midler’s carrot cake recipe.  I have no evidence whatsoever to substantiate that, just my bad memory.  I’ve Googled “Bette Midler’s Carrot Cake” and found nothing.  There was recipe for Katie Couric’s Lemon Loves (lemon bars) in the same magazine.  And there were cute cartoon illustrations of both Katie and Bette.

carrot cake recipe

At any rate, this is an amazing carrot cake.  So amazing, in fact, I’ve even renamed it “The Best Freakin’ Carrot Cake”.

My sister-in-law Kelly requests it for her birthday. (Oh, and btw, this would be Kelly the self-proclaimed non dessert lover, as in “I prefer fruit over dessert”…who, I am proud to say that I am slowly but surely reforming.  In addition to said carrot cake, she’s now a fan of my Double Chocolate Brownies and Salted Brown Butter Rice Krispie Treats!)  Okay, so one year, a girlfriend of one of my nephews joined us at for Kel’s birthday celebration.  She was in the process of starting her own food blog (CookingCuisine101).  We talked a lot about food and cooking and blogging and she encouraged me to start my own.  (I did.  Thanks Breeana!)  She’s a doll and she liked the carrot cake so much, she used the recipe as one of her very first posts.

I’ve actually adapted it a bit over the years (sorry, Bette) by reducing the amount of vegetable oil and increasing the amount frosting.  If you’re really trying to impress someone, decorate it with Candied Carrot Shreds.

And if you have any idea what magazine that was, please let me know.

The Best Freakin’ Carrot Cake

INGREDIENTS

Cake:

2 cups all-purpose flour

2 cups granulated sugar

2 teaspoons baking soda

2 teaspoons baking powder

2 teaspoons ground cinnamon

4 large eggs, lightly beaten

1 cup vegetable oil

3 cup grated peeled carrots (appx 5-6)

1 8-ounce can crushed pineapple, drained

1/2 cup pecans or walnuts, chopped (optional)

Frosting:

3/4 c. (1-1/2 sticks) unsalted butter, at room temp

12 oz. cream cheese, at room temp

1 Tbsp. vanilla

6 cups powdered sugar

DIRECTIONS

To make the cake:  Preheat oven to 350°.  Grease and flour three 8-in. round cake pans.  Sift the dry ingredients into a large bowl.  Add the eggs and oil, and stir until well blended.  Fold in the carrots, pineapple and pecans, stirring until thoroughly blended.  Pour one-third of the batter into each pan.  Bake for 30 minutes or until a toothpick inserted in the center comes out clean.  Cool the cakes in the pans for 15 minutes, then remove from pans and let cool completely on wire racks.

To make the frosting:  Place butter and cream cheese in a large bowl.  Using an electric mixer set at medium speed, cream the butter and cream cheese until light and fluffy.  Add the vanilla.  Reduce the speed to low and then gradually beat in the powdered sugar until the mixture is smooth.  Frost the cake.

Decorate with chopped nuts and/or Candied Carrot Shreds

Candied Carrot Shreds:

1/2 c. shredded carrot

1/2 c. sugar

1/4 c. water

1 T. Sugar in the Raw

Cover baking sheet with parchment paper or silicone mat.

In a small saucepan over medium heat, stir water and sugar together until sugar dissolves.  Bring to a boil.  Add carrot shreds.  Simmer for appx 15 minutes.  Strain.  Spread carrot shreds onto baking sheet.   Sprinkle with Sugar in the Raw.

Air dry for appx two hours OR place in very low temp oven (heat to 200°, then reduce to “warm”) for 30-45 minutes.

Potato and Chorizo Tortilla

chorizo fritatta

This dish came to be one night when I just didn’t feel like going to the grocery store and decided to make something from ingredients that we already had.  There was a package of Trader Joe’s Soy-Chorizo (tastes like regular pork chorizo, but it’s made from soy…personally, I like it better than regular chorizo) that had been in the fridge for a while.  There was a little leftover arugula, some eggs, a lot of cheese and a couple potatoes.

I remembered that my friend Jessica had posted a picture on Facebook of a Spanish tortilla she had made.  (A Spanish Tortilla, btw, has nothing in common with the Mexican tortilla except its shape and its name.  Basically, it’s an open-faced potato and egg omelet.)  I tried to find Jessica’s post, but couldn’t, so turned to Google.  I found a recipe from Food Network’s Tyler Florence that looked good and easy.  His version calls for Spanish chorizo, which is more like a hard salami, but all I had was that soyrizo, so that’s what I used.

It turned out to be a really wonderful, light and easy dinner that I’ll definitely make again.

Potato and Chorizo Tortilla

(adapted from Tyler Florence)

INGREDIENTS

3 tablespoons extra virgin olive oil

6 ounces (about half a 12-oz package) Soy-Chorizo (sometimes called Soyrizo)

2 medium potatoes, peeled and cubed

1/2 medium onion, chopped

4 large eggs

1/4 cup milk

kosher salt and freshly ground pepper, to taste

1 cup arugula (or baby greens) for garnish

1/2 lemon, juiced

1/2 cup Cotija cheese (or feta cheese), crumbled, for garnish

DIRECTIONS

Preheat the oven to 375°.

Pour 2 tablespoons olive oil into a non-stick, ovenproof skillet over medium-high heat.  Add the potato and onion and fry until the onions start to soften, about 5 minutes.  Reduce the heat and cover the skillet; cook until the potatoes are tender, about 10 minutes.  Remove the cover, raise the heat, and cook until the potatoes are brown and crispy, about another 5 minutes.

Remove the chorizo from the casing and crumble into potato-onion mixture and stir a couple minutes, just until heated through.  Note:  if you are going to use regular (not soy) chorizo; it will have to cook longer;  so cook it from the beginning with the potatoes and onions.

Meanwhile, break the eggs into a large bowl, add the milk, season with salt and pepper, and whisk until frothy.  Pour the egg mixture into the pan, shaking the pan to distribute the eggs evenly.  Put the pan into the oven and cook until puffy and set, about 12 to 15 minutes.  Turn out onto a cutting board and let it cool a little.  In a bowl, toss the arugula with the remaining oil and lemon juice; season with salt and pepper.  Place the greens on top of the tortilla.  Crumble the Cotija cheese over top.  Cut into wedges and serve.

Acai Bowl with Tropically Inspired Everyday Granola…and a little Aloha

2013-02-17 005

Tony and I recently went to Oahu, Hawaii.  Well, actually, Tony was there on business (my father-in-law owns a commercial property in Honolulu and for the past year or so, Tony has been helping out with the property management) and I was finally able to “tag along” and flew over to meet him for a few days.

We had a really great time exploring the island.  We drove to the North Shore one day and just happened upon the Volcom Pipe Pro surf contest at Banzai Pipeline.  THAT was very cool.

2013-02-02 010

2013-02-02 020

Volcom Pipe Pro, Pipeline, North Shore, Oahu

We did a couple of really beautiful hikes…on the Kanealole Trail in the rainforest and all the way to the top of Diamond Head crater.  We even spent a little time just relaxing on Waikiki Beach and watching spectacular sunsets from our lanai.

Kanealole Trail

Kanealole Trail

View from the top of Diamond Head

View from the top of Diamond Head

Sunset at Duke's

Sunset at Duke’s

And, I guess it goes without saying, we ate some really good food too – fabulous dinners at Town (by far my favorite…the Salted Chocolate Pretzel Tart was to die for!) and Nico’s at Pier 38; mai tai’s and a gorgeous sunset at Duke’s and a yummy and healthy lunch at the very hip Fresh.  I even had my first ever Acai bowl from the Tropical Tribe food truck…which brings me to the point of this post.

photo1

Acai.  Pronounced ah-sah-yee.  The latest “superfood” that’s been popping up in health food stores and breakfast cafes and smoothie shops.  The berries are supposedly good for everything…anti-aging, weight loss, and overall health.  They come from acai palm trees found in Central and South America.  I admit I’m usually pretty skeptical anytime anything is called a superfood (I tried the goji berry and blech!) and it wasn’t really on my list of top five things to do in Hawaii, but the young Brazilian guy who owns Tropical Tribe is considering leasing space from my father-in-law, so Tony suggested we go by and give it a try.  So we did.  We had just finished our Diamond Head hike and were pretty hungry.  They do acai shakes and bowls…we opted for the bowl, served with granola, a little fruit and drizzled with honey.  It was a delicious, healthy and satisfying mid-morning snack.

So, upon returning to San Diego, I was inspired to make my own acai bowl, but frankly, didn’t know much about acai or where to even buy it.  I Googled and must have found a hundred different recipes.  And, as it turns out, our local health food store carries acai in the frozen individual puree packets.  (Apparently, you can also buy it in juice form and even sorbet.)  So I bought some and played around and experimented with a couple of different recipes.

2013-02-17 001

You’re basically just making a really thick smoothie.  The instructions on the brand I bought said to just break up the frozen packet and put it in a blender with some frozen fruit, a little liquid (if needed) and a little sweetener (if desired).  Well, I don’t know if it’s because our blender is about a thousand years old, but those frozen chunks of acai weren’t going anywhere at first!  I had to let them defrost a bit.  Then I blended the acai, frozen fruit and juice together until smooth; added half a banana and some agave syrup.  I topped it with some Everyday Granola (new tropically inspired version!), sliced banana and strawberry.  Is it a superfood?  Am I aging less?  Lol.  that has yet to be seen, but it is yumminess and aloha in a bowl!

Acai Bowl with Tropically Inspired Everyday Granola…and a little Aloha

(makes one large serving or two smallish servings)

INGREDIENTS

1 3.5-ounce pouch frozen acai puree

1 cup frozen fruit (any combination of your faves.  I used a berry medley and pineapple)

1/4 cup orange juice

1 whole banana, peeled and cut in half (divided use)

1 tablespoon agave syrup or honey (or more or less, adjust to your taste)

1/2 cup Everyday Granola (Tropically Inspired version…see below)

1/2 cup your favorite fresh fruit

DIRECTIONS

Defrost acai packet slightly (if you have a really powerful blender, you probably can skip this step) and put in blender.  Add about a cup of your favorite frozen fruits.  Pour in orange juice (you might need more or less of this too, depending on the thickness you want).  Blend until smooth.  Cut half of the banana into big chunks; add to blender.  Add agave or honey.  Blend again until everything is incorporated and smooth.

Spoon into a bowl (or two) and top with Everyday Granola (tropically inspired version, see below, or regular); the other half a banana, sliced, and whatever other fresh fruit you like (berries are really good).

PS…Tropically Inspired Everyday Granola

2013-02-17 004

While we were in Hawaii, I bought some plain Greek yogurt and a bag of really expensive tropical granola to have for breakfast, while sitting on our lanai watching the sun rise over Waikiki & Diamond Head.

Sunrise over Diamond Head

Sunrise over Diamond Head

The granola wasn’t as good as Everyday Granola, of course, but it did have big pieces of macadamia nuts in it. I love macadamias!  Our friends Chip & Dale have a macadamia tree in their backyard and if you’ve ever wondered why macadamia nuts are so expensive, ask Chip & Dale about the whole process of picking them and shelling them and dehydrating them and husking them.  Oy. I mean, I’m talking over 7300 nuts this year!!!  We were the lucky recipients of a bag of macadamias, which I had been dying to use.  Ah ha moment…tropical granola.  So I made a batch of Everyday Granola, substituting the macs for pecans and a tropical dried fruit mix (kiwi, pineapple, mango, papaya) instead of my usual dried cranberries and golden raisins.

Aloooooo-HA!

Croissant Bread Pudding with Mexican Chocolate and Almonds

IMG_5143

I met local chef/restaurateur Isabel Cruz a few years ago at a Chef Showdown fundraiser benefiting the Center for Community Solutions.  She was selling and signing copies of her newly released cookbook Isabel’s Cantina (from her restaurant of the same name).  Even though at the time I hadn’t been to one of her restaurants, she was offering some pretty yummy dishes for sampling, the book was pretty and she seemed nice, so I bought a copy. Besides, as I’ve mentioned before, I’m a sucker for cookbooks and, in particular, chef-signed cookbooks.

2013-01-27 002

The food photos in the book are gorgeous.  I love her twist on Latin and Asian cuisine.  And most of the recipes appear really simple.  I say “appear” because I’ve only actually made two of the recipes from the book.  One is a salad…Heirloom Tomato and Red Onion with Cilantro Sauce.  The other is this dessert.  Croissant Bread Pudding with Mexican Chocolate and Almonds.  I mean, come on!  As Isabel herself says about this recipe, “warm and delicious, bread pudding is always a treat, even more so when it’s made with flaky croissants and cinnamony Mexican chocolate.”

This recipe is really delicious and really impressive.  It looks and tastes a lot more difficult than it is.  Really.  And every time I make it, people freak out about how good it is, often saying, “this is one of the best things I’ve ever tasted”.  And somebody always asks for the recipe.  Now you don’t even have to ask!!!

I serve it with a little dollop of whipped cream flavored with a little Kahlua.  And I promise, it will be one of the best things you’ve ever tasted.

Croissant Bread Pudding with Mexican Chocolate and Almonds

INGREDIENTS

Croissant Pudding

Butter, for the pan

3 large eggs

1-1/2 cups half and half

2 tablespoons packed light brown sugar

4-6 croissants, enough to fill a 9″ pie plate, split in half as for a sandwich

1 cup sliced almonds

Mexican chocolate (recipe follows)

DIRECTIONS

Preheat the oven to 350°.  Butter a 9″ pie plate and set aside.

Combine the eggs, half and half and brown sugar in a large bowl.  Whisk to combine.  Press the sliced croissants into the egg mixture and soak for about 3 minutes, turning once or twice.  They should absorb the egg mixture but not to the point of falling apart.  Fit the bottom half of each croissant into the buttered pie plate, sliced side down.

Sprinkle 1 cup of the Mexican chocolate over the croissants and then 1/2 cup of the almonds.  Layer the remaining halves of the croissants, sliced side down again, on top.  Sprinkle the remaining 1/2 cup chocolate and the remaining almonds over the top.

Bake until puffy and dry on top but still moist inside, about 45 minutes.  Remove from the oven and let cool slightly before cutting and serving.  Serve warm, at room temperature, or chilled.  Sprinkle with powdered sugar before serving.  Serve with Kahlua whipped cream.

The bread pudding can be stored, covered, in the fridge for up to 4 days.

 Mexican Chocolate (makes 1-1/2 cups)

1 cup semisweet chocolate chips

1/2 cup sugar

1 tablespoon ground cinnamon

Combine the chocolate chips, sugar and cinnamon in a food processor and pulse until finely ground.  Store in a cool, dry place in an airtight container.

Cobb Salad

2013-01-23 006

Cobb Salad is (yet another) salad we make very often in the Bruser household and it’s one of our favorites.  Avocado, hard-boiled eggs, chicken, bacon…mmmm!  I had clipped the recipe (for Cobb Salad with Brown Derby French Dressing) from our local paper years ago.   The last time I started to make the salad,  I couldn’t find the recipe!!  Aaagh.  Of course, I know all the salad ingredients by heart, but not the dressing.  I mean, I know what’s in there, and I could probably come pretty close to replicating it, but it was making me crazy.

So I Googled and I found many versions of what every recipe calls “the original” and I learned a little bit about the history of the salad.  Seems the famous American classic salad was concocted in the late 1920’s by Robert “Bob” Cobb, manager of the famous Brown Derby restaurant (aptly shaped liked a derby hat) in L.A.  This is the restaurant where the walls were covered with caricatures of famous stars.

BrownDerby4

The Brown Derby

The Cobb Salad was one of the first “composed” salads that were soon copied at many other restaurants.  The Cobb is a chopped salad (ingredients are individually chopped into small pieces) and then arranged on a plate or shallow bowl with each ingredient in its own row or pile on a bed of chopped greens.  (Oops!  My bad…I’ve been making it as a regular tossed-in-a-salad-bowl-salad all these years!)  The special French dressing is added and the salad tossed just at serving time.  And it is traditionally served as a main course salad.

IMG_4094

The version we’ve been doing for ever!

As with most recipes, I’ve tweaked this one a bit over the years too…with all due respect to Bob Cobb.  Oh, and after reading about how this salad is supposed to be served, we tried the traditional composed presentation.  A little more preparation, but very attractive and oh-so-old-Hollywood!

 Cobb Salad

INGREDIENTS

Salad:

6 cups chopped lettuce (any combination you like – iceberg, red leaf, romaine.  The original called for watercress)

3 cups chopped, cooked chicken (I’ve used leftover turkey and even steak!)

2 medium tomatoes, seeded and chopped

4 strips bacon, crisp-cooked and crumbled

1/2 cup crumbled blue cheese

2 hard-boiled eggs, chopped

2 green onions, chopped

1 medium avocado, chopped

Brown Derby Special French Dressing:

1/4 cup water

1/4 cup red wine vinegar

1/2 teaspoon sugar

1 tablespoon fresh lemon juice

1 teaspoon Worcestershire sauce

3/4 teaspoon dry mustard

1 clove garlic, minced

1/4 cup olive oil

3/4 cup vegetable oil

salt & pepper to taste

DIRECTIONS

For the salad:  Individually chop all the salad ingredients into very small pieces.  Arrange decoratively on a serving platter or large shallow bowl or into individual plates.  (OR, commit blasphemy and just put everything in a big salad bowl and toss together.  LOL.)  Drizzle with enough dressing to moisten.

For the dressing:  In a jar with a lid, place all of the dressing ingredients except the oils and shake vigorously to combine.  Add olive oil and vegetable oil.  Shake well again.

Cashew Butter Balls

pecan butter balls

I’m not sure when I became such a cookie fan.  I think probably it had something to do with Smitten Kitchen’s Margarita Cookies.  Or maybe my friend Dale, the Cookie Queen.  She and her husband Chip (yes, Chip and Dale) are rugelach masters.  And Dale usually has an assortment of cookies in her freezer when you go to their house.

Just a sampling of Dale's cookies on one visit!

Just a sampling of Dale’s cookies on one visit!

Dale bought me Dorie Greenspan’s Baking: from My Home to Yours, which includes favorites like World Peace cookies, Chockablock cookies and Peanut Butter Oatmeal Chipsters.  Apparently SK’s Deb Perelman adapted her Margarita Cookies from Dorie’s recipe (but you knew that, didn’t you, because you read all about the cookies on this blog).

I am having a really difficult time trying to decide on my current favorite.  Every time I make a new recipe I’m convinced that one is my new favorite (i.e., Potato Chip Cookies, Oatmeal Pomegranate Chocolate Chip Cookies) and now Cashew Butter Balls from SK.  A little like Mexican Wedding Cookies. (Which, btw, are called polvorones in Mexico.  There’s a cooking show I catch occasionally called Pati’s Mexican Kitchen.  Pati was born and raised in Mexico City.  She posted a recipe for the cookies, but said she had never heard them called Mexican Wedding Cookies until she moved to the US.  She says she didn’t have them at her wedding or at any other Mexican wedding she’s ever attended!  Lol.)

Okay.  I digress.  Again.  So when I brought the Cashew Butter Balls to work to share, one person called them “Russian Tea Cakes”.  Another “Powdered Nut Balls”.  All are basically the same recipe, only this one is made (obviously) with cashews and I love cashews.  Could be my new favorite.  Lol.

Cashew Butter Balls

Makes about 40 cookies

INGREDIENTS

1 cup raw cashews
2 cups all-purpose flour
1/4 teaspoon table salt, or a heaped 1/4 teaspoon sea salt flakes
1 cup (2 sticks) unsalted butter, softened slightly, cut into chunks
2 cups powdered sugar, divided
1/2 teaspoon vanilla extract

DIRECTIONS

Heat oven to 350°F and toast cashews in a single layer until a shade darker, about 10 to 12 minutes. About halfway through the toasting time, toss the nuts around to redistribute them for even coloring. Let cool completely.

Place cooled cashews, flour and salt in the work bowl of a food processor and grind the mixture to a fine powder. Pour mixture into a bowl and set aside briefly.

Add butter and only 1/2 cup of the powdered sugar to the empty food processor and run the machine until the mixture is creamy and combined. Add the vanilla and mix. Add the nut-flour mixture and pulse the machine until it is just combined. Scrape the soft cookie dough back into the bowl that held the nut-flour mixture, cover it with plastic wrap, and refrigerate it until firm, about an hour.

[Do ahead: You can chill it in the fridge for up to 2 days, or in the freezer for longer.]

Heat your oven back to 300°F. Place remaining 1 1/2 cups powdered sugar in a wide bowl. Using your hands, scoop tablespoon-sized (about 1-inch round) balls of the chilled cookie dough into your palms and quickly roll them into little balls. Place them evenly on a parchment-lined baking sheet an inch apart. Bake 20 to 25 minutes, until they feel dry on the outside, but still quite soft. (Don’t fret!)

Let cool on sheets for a few minutes, then gently roll the hot cookies in the powdered sugar before transferring them to racks to cool completely.

Cookies keep in an airtight container for at least a week, probably two, though never at my place. They can be frozen for as long as you trust your freezer. They occasionally benefit from a fresh coating of powdered sugar before serving.

Greek Chicken with Potatoes and CHUNKY Greek Salad

2013-01-16 002

I had to work late the other night, so Tony offered to make dinner.  Yes, you read that right.  Tony offered to make dinner.And, really, it’s not the first time.  (I know.  He’s a keeper.)  He said he was dying for a Greek Salad (there’s not much Tony loves more than a chunky Greek salad!).  We tossed around a few “protein” ideas and I remembered a baked Greek chicken and potatoes recipe that I used to make all the time but we hadn’t had in a while.  I told him it’s really easy…you basically just put chicken breasts, olive oil, lemon juice, potatoes and oregano in a baking dish and put it in the oven.  I gave him a grocery list and left for work.

Around 5:30, I get a text from him that says, “What time should I have dinner ready?”  (Uh…yes…I know.)

2013-01-16 001

I arrived home around 6:45pm to the wonderful aroma of chicken, lemon and oregano, a fire in the fireplace AND a glass of Pinot Noir waiting for me.  (Yes, I know.)

We ate in front of the fireplace, Tony talking all the while about his culinary prowess.  “You know the secret to a good Greek salad?  It has to be chunky…big pieces of vegetables.  This chicken is really good and its so easy.”

And, yes, it was all delicious.  I’m considering changing my schedule to work late more often!

2013-01-16 006

Greek Chicken and Potatoes

(adapted from Bon Appétit, April 1992)

INGREDIENTS

1 3 1/2-pound chicken, quartered (OR, we use 4 chicken breasts halves)
4 russet potatoes, peeled, quartered, lengthwise (I actually had never peeled them, but Tony did, and, I have to admit, they were much better)
4 large garlic cloves, halved
3/4 cup canned low-salt chicken broth
1/2 cup olive oil
2/3 cup fresh lemon juice
2 teaspoons dried oregano, crumbled

DIRECTIONS

Preheat oven to 375°F. Arrange chicken, potatoes and garlic in large roasting pan. Season with salt and pepper. Pour broth over. Whisk olive oil, lemon juice and oregano to combine. Pour evenly over chicken and potatoes.

Bake until chicken is cooked through and golden brown and potatoes are tender, basting occasionally with pan juices, about 1 hour 15 minutes.

2013-01-16 005
CHUNKY Greek Salad

(salad by Tony Bruser; vinaigrette from some recipe Cheryl found somewhere)

INGREDIENTS

1/2 cup olive oil

1/4 cup red wine vinegar

1 teaspoon garlic powder

1 teaspoon dried oregano

1 medium cucumber, peeled, halved lengthwise, seeded and sliced into big CHUNKS

2 green bell peppers, seeded and cut into big CHUNKS

4 large tomatoes, cut into big CHUNKS (or use cherry tomatoes, halved)

1 large red onion, cut into (yep you got it) big CHUNKS

1/2 cup feta cheese, crumbled

1/2 cup Greek olives, Kalamata olives, or any other brine-cured black olives

DIRECTIONS

Whisk oil, vinegar, garlic powder, and oregano in small bowl to blend. Season vinaigrette to taste with salt and pepper.

Combine cucumbers, tomatoes, onion, cheese, and olives in very large bowl. Add vinaigrette to salad and toss to coat.

Everybody’s Favorite White Chili

IMG_5494

It’s been really cold in San Diego lately. Seriously. I mean, not cold by like Green Bay, Wisconsin standards, but really cold by San Diego standards. It was 39 degrees when I got up this morning! Perfect weather to make Everybody’s Favorite White Chili. This recipe is from the very first issue of Bon Appétit that I ever received (remember that gift subscription for my birthday from my friend Linda?)…March 1991. It was called Timothy’s White Chili because it was from a restaurant called Timothy’s in Louisville, KY (which apparently has since closed).

It has chicken instead of beef and white beans instead of the usual red kidney beans. I garnish it with jack cheese, sour cream and cilantro. It’s a little spicy, really hearty and delicious. I’ve simplified it over the years, using a store-bought roasted chicken and canned beans. It’s a family favorite. In fact, I submitted the recipe for the cookbook that was put together at our kids’ elementary school back in 1999. I renamed it Everybody’s Favorite White Chili for that cookbook and the name stuck. Because it is.

It would be great to serve at a Superbowl Party. Or on a cold San Diego evening.

Everybody’s Favorite White Chili

INGREDIENTS

3 16-ounce cans Great Northern white beans, drained

2-3 cups cooked chicken, cubed or shredded

1 tablespoon olive oil

1 medium onion, chopped

4 garlic cloves, minced

2 4-ounce cans chopped mild green chilies

2 teaspoons ground cumin

1-1/2 teaspoons dried oregano

1/4 teaspoon ground cloves

1/4 teaspoon cayenne pepper

4 cups canned chicken broth

Approximately 3 cups shredded jack cheese

Cilantro

Sour Cream

Instructions

Heat oil in large pot over medium-high heat. Add onions and saute until translucent, about 10 minutes. Stir in garlic, then chilies, cumin, oregano, cloves, and cayenne pepper and sauté 2 minutes.

Add beans and broth and bring to boil. Reduce to a simmer and cook for about 30 minutes. Add chicken and 1 cup cheese to chili and stir until cheese melts. Continue to simmer for another 30 minutes. Season to taste with salt and pepper.

Ladle chili into bowls. Serve with remaining cheese, sour cream, salsa and cilantro.

No-Knead Artisan Bread

Oh, the aroma of freshly baked bread!  Can there be anything better?  Bread is our most basic, yet one of the most delicious and satisfying, foods.  In the words of Robert Browning, English poet and playwright, “If thou tastest a crust of bread, thou tastest all the stars and all the heavens.”  Okay, so maybe that’s a little over the top, but bread is a very good thing.  And what could be more rewarding than baking your own?

What I’m about to share with you is a really easy bread recipe.  Really.  Easy.  Bread.  Recipe.  And delicious.  AND you can make the dough, use as much or as little as you want, and then keep the rest in the fridge for up to two weeks (though I doubt it’ll actually last that long.  Even with just the two of us, we went through the whole thing in a week.  It is so good!!)

The recipe comes from Kathleen Flinn’s book The Kitchen Counter Cooking School: How a Few Simple Lessons Transformed Nine Women into Fearless Home Cooks.  I had the pleasure and honor of meeting and baking bread with Kathleen at a fun Adventures by the Book author event not too long ago.  She was so knowledgeable and so inspiring!  Kathleen also wrote The Sharper Your Knife, the Less You Cry, a memoir, with recipes, about her experiences leaving the corporate world to study at Le Cordon Bleu in Paris.  The Kitchen Counter Cooking School explores a project in which she tries to understand why people rely on convenience foods and what kinds of cooking lessons make an impact on inexperienced cooks.

I personally learned more about cooking from these two books than I have from any cookbook in my expansive collection.  I mean, we all know how much I love Smitten Kitchen, but Kathleen shares some good basic information…not only useful hints like the proper way to hold a knife, but good nutrition information and reasons why its less expensive and healthier, to cook, rather than buy, frozen or pre-prepared packaged meals.  Did you know that a basic Fettucini Alfredo sauce has basically only two ingredients…heavy cream and Parmesan cheese?  So why would you buy a boxed or frozen variety that’s loaded with all kinds of preservatives and ingredients you don’t need?

Okay, so I digress.  I’m going to say it again…the bread is really delicious and really easy.  And I’d like all of you to give it a try.  I’ve got a batch of dough in the fridge waiting to be baked.  You can mix it up a little by using half whole wheat flour.  Or stirring in a bit of your favorite fresh herbs.  And I’m telling you, once you’ve baked and tasted bread that you’ve made from scratch, it’ll be really difficult to rationalize buying a little loaf of artisan bread at the supermarket for $4!  (Plus, really, just the aroma of bread baking in your oven…wafting from your kitchen??!?!?)

No-Knead Artisan Bread

(makes four 1-pound loaves)

The original recipe is adapted from www.artisanbreadinfive.com

INGREDIENTS

3 cups lukewarm water

1 tablespoon yeast

1 tablespoon kosher salt

6-1/2 cups unsifted unbleached all purpose white flour (or you can use half whole wheat flour)

Additional flour to create loaves

Cornmeal

DIRECTIONS

Combine water, yeast and salt in 5-quart bowl or plastic container. Stir to mix. Add all flour at once and mix with a wooden spoon until dough is wet and sticky with no dry patches. Cover with plastic wrap or lid (but do not seal airtight…you want the gases from the yeast able to escape) and let rise for 2 hours at room temperature. If you are not using immediately, you can refrigerate the dough, covered, for up to 2 weeks.

To make a loaf, lightly sprinkle flour onto dough’s surface. Scoop a handful about size of grapefruit and tear away from the rest. Rub the dough with flour while gently stretching the top around to tuck the sides into the bottom to form a round, smooth blob.  Note:  Tonight, at this point, I chopped a couple tablespoons of fresh rosemary and “kneaded” it into the dough…it was amazing!  Put the loaf on a pizza peel or cutting board dusted with cornmeal to prevent sticking.  Let it rise, uncovered,  for at least half an hour or up to 90 minutes.

About 20 minutes before baking, preheat oven to 450°. Place a broiler tray or other flat metal pan on the bottom rack of oven. Put a cookie sheet, pizza stone, or cast iron skillet on middle rack.

Dust the loaf liberally with flour. Slash top with “X” or  3 lines. Slide bread onto pre-heated cookie sheet, pizza stone, or cast iron skillet. Carefully pour one cup of water into broiler pan. Close the oven door to trap the steam. Bake for 30 minutes, until the crust is brown and the loaf feels light and hollow. Cool to room temperature.

Keep the remaining dough in the fridge. Use as desired. So good.  And really delicious toasted!